 |
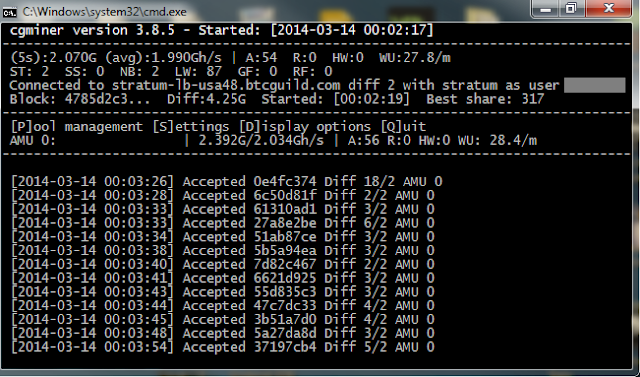
| Antminer in action. |
Wading through search results majoring in the sales of BITMAIN Antminers, ASICMiner Block Erupters, and all other variety of devices one can find a few quality resources with installation instructions for the previous version of the Antminer. Finding a guide specific to the U2 was a challenge and I am yet to be successful. Luckily the technology is not far off from the U1 and so the setup was basically the same.
Note: This installation is for Windows 7 64 bit. Other operating systems may vary.
Before inserting the Antminer I needed to accumulate a host of software and drivers. I also needed to establish that my account with the mining pool BTC Guild was still active and accessible. I was easily able to log in with my old credentials. There were also a few fractions of Bitcoin left that I never paid out. Actually these were what I thought was in my wallet but couldn’t recover. No losses! For future reference, mining with NVidia GTX 560 is not fruitful…
The account with BTC Guild pool is good to go and I have miners set up there. I took note of the host URL, my miner or username, and the password for use later when launching the mining client.
I found many recommendations, and instructionals, pointing towards BFGMiner and CGMiner. In truth, I couldn’t get BFGMiner to work last night. I may give it another try but for the scope of this project it may not be worth the time. CGMiner gave me some issues but at the 11 th hour I found the magic combination of arguments to pass and USB finagling voodoo when launching that got it working. I didn’t let it mine over night as my PC is a bit too power thirsty for a long run mining mission. Tonight, or sometime this weekend, I will fire up my laptop and run through this installation again to see what I can get for a few days’ worth of mining.
Now on to installing the Antminer. It is a USB device and obviously not plug and play compatible. So using it out of the box is impossible. The computer and mining clients have no clue what to do with it other than say it’s plugged in… maybe. You will need to grab the branch of CGMiner from Github specifically tailored to mining with the Antminer. I know it says for the U1 but it does work with the U2. Make sure to get the latest stable release, as with any software. Extract it to C:\ into its own directory for easy access from the command line. Next download the Silicon Labs CP2102 driver for your operating system and install it. Finally, download and install Zadig, a piece of software that offers a GUI for USB device driver installation.
Insert the Antminer U2 and let the computer acknowledge it. Next, and very important, launch Zadig and click “Option” -> “List All Devices” and select [CP2102 USB to UART Bridge Controller] then click “Reinstall Driver” or “Replace Driver.” In all honesty it would be nice to have some confirmation that the Antminer U2 was correctly installed and functioning but that may add too much overhead and cost to the package.
Launch command prompt. Drill down to the directory where CGMiner was installed. You can launch CGMiner using
cgminer.exe --bmsc-options 115200:20 -o [your pool URL] -u [your username/miner] -p [your password] --bmsc-freq 0781
I finalized this line after various other attempts sourced from forums and instructional pages. You should see some output and it should eventually start mining after requesting block information and jobs from the pool.
The whole process above is finicky. If the Antminer is not plugged in it will pause and output that it is waiting for the device. You can plug the device in but it won’t acknowledge it. If the miner is plugged in CGMiner will start but may not begin mining. In one instance I managed to get CGMiner running and mining but it was using my GPU. I was actually unsure of which device was being used to mine until I opened a system monitoring app and notice my GPU was clocking at 99%. With the line above it should specifically use the Antminer and nothing else.
To make life easier I prepended the location of the .exe and saved this line
C:/cgminer/cgminer-run/cgminer.exe --bmsc-options 115200:20 -o [your pool URL] -u [your username/miner] -p [your password] --bmsc-freq 0781
in a .CMD file. That file resides on my desktop and when double clicked launches CGMiner with the appropriate settings.
Results from mining for a few minutes are in the picture.


